Sunday, March 28, 2010

Eyes

I apologize for the long delay, but between going out to shoot and staying in to write and edit those select shots I am including in a couple of upcoming works, I haven't had much time to share some tips on here...so, for that I apologize.

Today I want to point out the importance of making your subjects eyes clear and how Photoshop, or Lightroom, can help you. Rule one in animal photography is to have the eyes in focus and clear...as beady as you can make them...but sometimes the light situation or an off exposure will make your pictures come with darkened, unclear eyes. Notice I'm not blaming the lenses since there isn't much we can do about that at the moment because even those with the sharpest lenses do come up with photographs with darkened eyes. So, without further ado, let's see the differences...

Canon 500D (Rebel T1i) with EF-S 55-250mm IS @200mm 1/640s F/5.6 ISO 100

You can click on the image to enlarge it and you will see the eye still somewhat dark and unattractive. Now, I have not adjusted the exposure or any other setting, but I want to stress the importance of shooting RAW especially as a beginner with less than good lenses or spot-on exposure settings. 
Now let's take a look at this one.


Click on the picture to enlarge it and see if there you notice the difference. I did increase the exposure, but I also used the Adjustment Brush in Camera Raw to focus on the eye and increase its contrast, clarity, and exposure. To up the color, I increased saturation all the way and a little on the brightness, too. That's the good thing about the Adjustment Brush, I could select and isolate the eye and work on it without altering the rest of the picture.
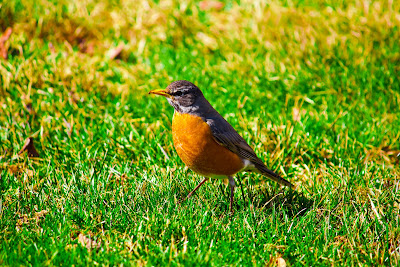
Now, let's take look at another photograph.

Canon 500D (Rebel T1i) with EF-S 55-250mm IS @250mm 1/640s F/7.1 ISO 100

For this set, everything is the same except for the eye and all that was needed to bring out its beauty was an extra isolated touching up using the Adjustment Brush in Camera Raw. You can see how its color contrast well with the rest of the picture and how it livens up the bird and the photograph in general. 


To end it all, here's a little something I made using this image to go along with today's subjects. Enjoy and, remember, to focus on the eye.


Friday, March 5, 2010

Blurry Pictures: What to do

It's been an interesting couple of days and I have been going out to take some pictures of the birds in the area since parts of the river have thawed. The pictures themselves weren't that impressive, the gulls and ducks were shy and stayed away, and I lacked the patience to wait since it was still chilly in the area. Anyways, I took a few photographs and edited them in Photoshop CS4 by adding a few effects. Some were edited in Camera Raw.

For this one (I won't list the exposure settings since I don't think it applies, but in case you're interested I was in TV (Shutter priority) at 1/400s) I increased the color temperature all the way and reduced the tint all the way to give it the blue and amber colors. I made a few other adjustments such as sharpening and contrast, but there wasn't much else I did.


This one, I shot at 1/600s and I didn't do anything to it in Camera Raw (I was simply too tired and lazy) but I converted to JPEG, sharpened it a little bit, cropped it to about 100%, and added a textures filter...I apologize, I don't remember which one it is, but you can play around and see if you can identify it. I picked this texture because of the details it brings out in the feathers.


This one was also shot at 1/600s and I edited it after I converted it to JPEG. I reduced noise, sharpened, and liquefy filter (under Filters tab in PS).


This one I really love, and I didn't even know I took it until I was trying to pick which ones to post on the blog. I took it at 1/600s and I did the same as the previous one...just sharpen, noise reduction, and used a filter (Pallette knife from the Artistic option).

The reason I edited these this way is because I used really slow lens to take them and they came out grainy and blurry. The Canon 55-250mm IS lens are really slow and the AF, though I use the AF Lock setting on the camera, really tried but failed. Many photographers will tell you that you should toss blurry pictures, but I think they can be salvaged and turned into different pieces of art. Although I'm primarily a writer, I consider myself an artist, first and foremost. As much as I paint pictures with words, it's my goal to also tell stories with my images, hence my love for photography. 

So, next time an image comes out grainy and too blurry to use, instead of tossing it aside, see what you can do to it...it might be an opportunity to create a different type of work of art. 
Happy shooting, folks, and a wonderful weekend.